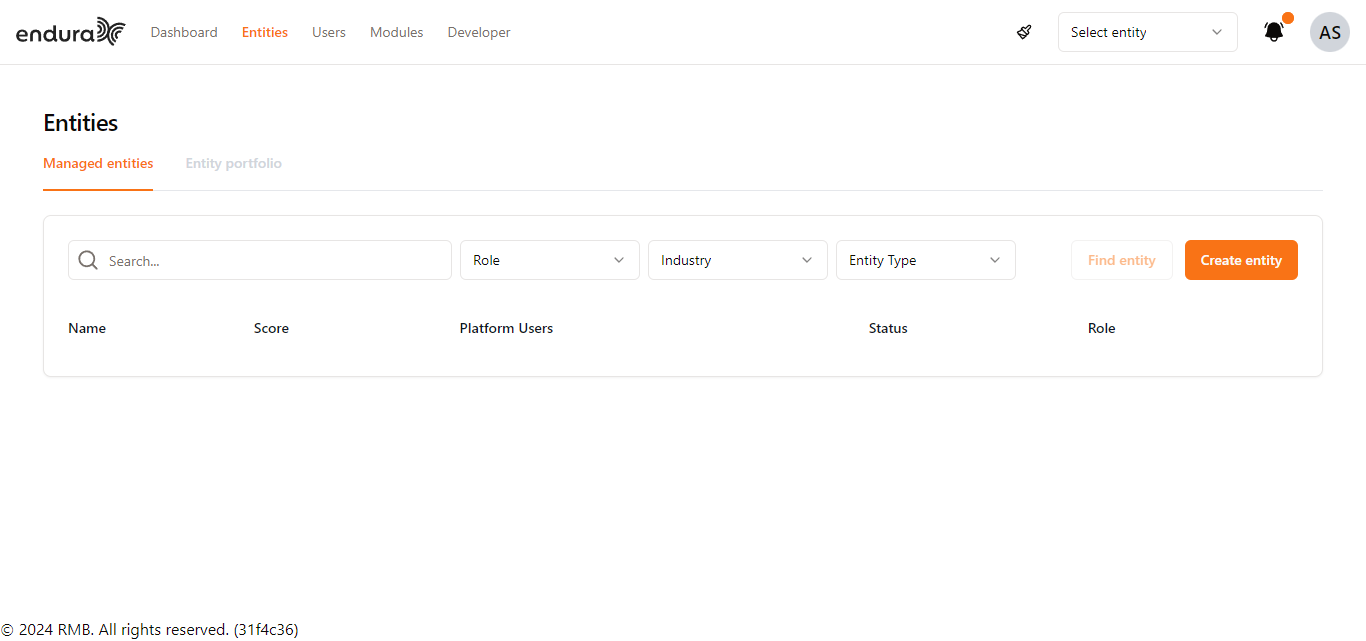
Managed Entities
Features
- Search Bar: To search for a specific entity, simply enter the entity’s name or relevant keyword into the search bar. The list will update automatically to display matching results.
- Filters: Utilize the filters for Role, Industry, and Entity Type to narrow down the list of entities displayed. This is particularly useful when managing a large number of entities.
- Viewing Entity Details: Click on an entity’s name in the list to view more detailed information related to that entity.
- Create Entity Button: Located on the right side, this button allows users to create a new entity. Upon clicking, you will be guided through a series of steps to set up the entity with necessary details such as general information, industry, location, size, and any specific modules or legal consents required.
- Find Entity Button: The Find Entity button, located next to the "Create Entity" button, is used to search for and connect with organizations.
Managed Entities
- This is the default tab where you can see the entities you have direct management access to. It lists entities with their Name, Score, Platform Users, Status, and Role.
- Name: The name of the entity.
- Score: The entity’s performance or evaluation score.
- Platform Users: Number of users associated with the entity.
- Status: The current status of the entity, such as access or pending access.
- Role: Their specific role or access level.
Entity: Managing Multiple Entities
The Entity Switch functionality allows admin users to easily switch between different entities they are managing, directly from the dashboard. This feature is particularly useful for users overseeing multiple divisions or business units, enabling them to manage data for different entities without needing to log out or navigate complex menus.
Where to Find the Entity Switch
Location: The entity switch is located at the top-right of the navigation bar, next to your user profile icon.
Dropdown List: Clicking on the currently selected entity name reveals a dropdown menu displaying the other entities you have access to.
How to Switch Entities
- Click on the Entity Dropdown located in the navigation bar.
- A list of all the entities you are assigned to will appear in the dropdown.
- Select the desired entity (e.g., "Test Division 0911-1") by clicking on its name.
- The page will refresh, and the dashboard will update to reflect the context of the selected entity.
Refreshing Entities: If recent changes were made to an entity and it does not reflect immediately, you can click the Refresh button from the dropdown list to reload the page with updated information.
Important Notes: Permissions: You can only switch between entities that have been assigned to you and where you have the necessary permissions. Context Update: After switching entities, all dashboards, reports, and data displayed will be specific to the selected entity. Be sure to verify that you are managing the correct entity before making any updates.
Profile and Notifications
Profile Icon (Top-right Corner): This circle shows your initials or profile picture. Clicking on it allows you to manage your account settings, billing information, log out, or switch between different profiles if applicable.
Notifications: Access your recent notifications by clicking the bell icon.